Category: Uncategorized

  • Headlight Color Temperature Explained: 3000K to 8000K and the Best Kelvin to Actually Run

    Headlight Color Temperature Explained: 3000K to 8000K and the Best Kelvin to Actually Run

    Shopping for headlight bulbs turns up a number stamped on every box — 4300K, 6000K, 8000K — and a widespread belief that a bigger number means a brighter light. It does not. That number is a color temperature in kelvin, and it describes the hue of the beam, not how much light reaches the road. Understanding what it does and does not tell you is the difference between a headlight that helps you see and one that just looks a certain way in a parking lot.

    What kelvin measures, and what it does not

    Color temperature comes from heating an idealized object until it glows, and noting the color at each temperature. Low values glow warm and amber, like a candle or an old halogen bulb; high values glow cool and blue, like an overcast midday sky. So kelvin is a hue scale, running from yellow through white to blue as the number climbs. What it deliberately leaves out is quantity. How much usable light a headlight throws is measured in lumens for total output, and in candela or lux for intensity at a point, and those depend on the bulb’s design, the reflector or projector housing around it, the beam pattern, and how well the light is aimed. Two bulbs can share the same 6000K rating and differ enormously in real brightness. Kelvin tells you the color of the light; it says nothing on its own about the strength of it.

    Walking the scale from 3000K to 12000K

    The practical range starts around 3000K, a golden yellow that closely mimics a factory halogen and is the classic choice for fog lamps. By 4300K the light is a warm white with a faint yellow cast, the tone many cars leave the factory with. Around 5000K it reads as a neutral, daylight-like white, and at 6000K it is a crisp, pure white with only the slightest blue edge — the point most drivers consider the sweet spot of modern-looking and still natural. Push past that and the beam turns visibly blue: 8000K is an ice blue, 10000K a deep blue, and 12000K crosses into purple. Those high numbers are sold on looks alone.
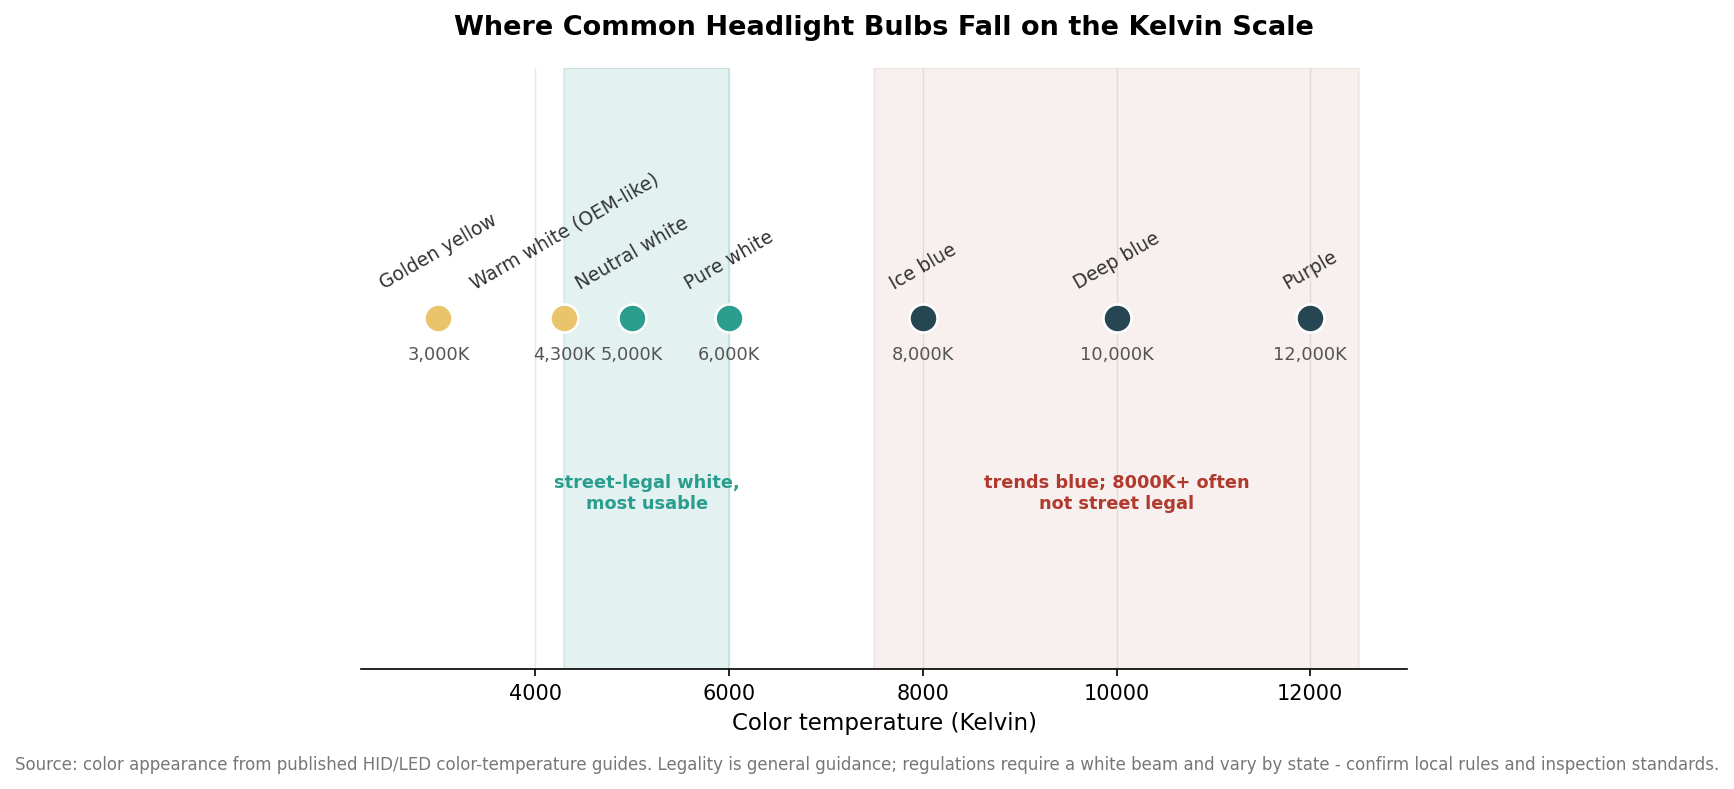
    Number-line chart showing where common headlight bulbs from 3000K golden yellow to 12000K purple fall on the Kelvin scale, with a shaded street-legal white band
    Common bulbs on the Kelvin scale; the shaded band marks the street-legal white range that stays most usable.

    The reason the low-to-mid range dominates real-world use is that it keeps the light white, which is both what regulations expect and what the human eye resolves detail best under. Once a bulb tips into blue, contrast on the road surface drops, road signs and lane markings lose their punch, and the styling gain comes at a real cost to vision. For a car you actually drive at night, the useful window sits between roughly 4300K and 6000K.

    The brightness paradox: why 8000K is dimmer than 5000K

    Here is the part that catches people out. Within a given bulb family, the usable light output does not keep rising with kelvin — it peaks in the white range and then falls as the beam goes blue. On a representative HID bulb line, output sits near 3,000 lumens at 3000K, climbs to about 3,200 lumens through 5000K and 6000K, then drops to roughly 2,600 lumens at 8000K, around 2,100 at 10000K, and under 1,800 by 12000K. A 12000K purple bulb can put out about the same light as the plain halogen it replaced, or even less.
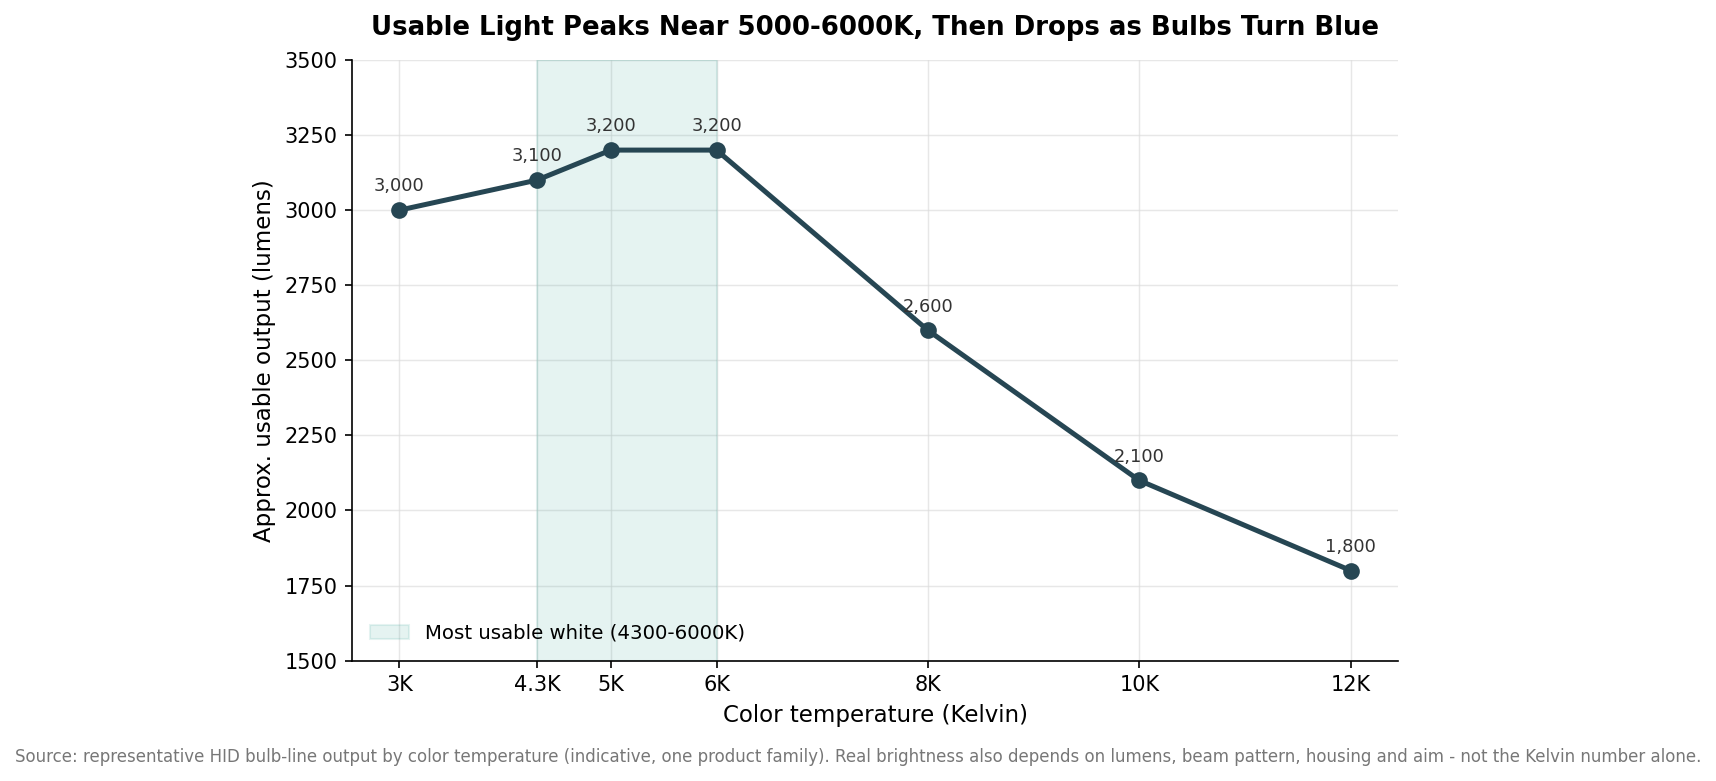
    Line chart of approximate usable headlight lumens versus color temperature, peaking near 5000 to 6000K and dropping as bulbs turn blue
    Usable output peaks in the white band near 5000-6000K, then falls as the beam turns blue.

    Two things drive that decline. Producing a bluer beam shifts energy toward wavelengths the eye is less sensitive to, so more of the output is simply harder to see, and the phosphors or filters used to hit very high kelvin values often cut total transmission in the process. Treat the lumen figures above as indicative of one product family rather than a universal law, because the exact numbers vary by brand and technology, but the shape holds across the market: the brightest, most usable light lives in the white band, and chasing a higher kelvin number past it trades away vision for color. If someone tells you their 8000K bulbs are the brightest they have run, the more likely explanation is a jump from tired halogens to a fresh, well-built assembly — not the blue tint.

    Rain, fog, and the case for a warmer beam

    Weather flips the usual instinct toward whiter light. Water droplets and airborne particles scatter short blue wavelengths more than long yellow ones, so a cooler, bluer beam bounces back at the driver as glare in fog, heavy rain, and snow, washing out the scene instead of lighting it. That physics is exactly why dedicated fog lights have long been yellow, and why a golden 3000K lamp can outperform a flashy 8000K one when the road is wet. It also nudges the everyday choice: many drivers find a 5000K white more comfortable than a 6000K-plus beam precisely because it throws less harsh reflection off wet pavement. If your driving includes real fog or snow, a warmer auxiliary or fog light earns its place even when your main beams are white.

    The law, inspections, and the practical pick

    Regulations in most places require headlights to emit white light, which is where the blue end of the scale runs into trouble. Bulbs at 8000K and above frequently fall outside the legal definition of white, so they can draw a citation and fail a safety or emissions inspection that checks lighting, regardless of how the box is marketed. Rules and enforcement vary from state to state, so the safe move is to confirm your local standard rather than assume a popular product is compliant everywhere. Beyond the letter of the law, a beam that reads as blue to oncoming traffic is more likely to be perceived as glare, which is its own hazard.

    Put it together and the practical pick is straightforward. For a daily driver, choose a bulb in the 5000K to 6000K range for the best mix of usable brightness, a clean white appearance, and easy compliance, and if you want maximum bad-weather performance add a warmer 3000K fog or auxiliary light rather than tinting the mains. Reserve anything 8000K and up for a show car that is not relying on those lights to see. Most importantly, do not shop by kelvin alone: match the bulb to your housing type, look at the lumen and beam-pattern specs, and aim the lights properly, because a correctly aimed 5000K setup will out-drive a poorly aimed 6000K one every night of the week.
  • Projector vs. Reflector Headlights: How to Choose the Right Housing

    Projector vs. Reflector Headlights: How to Choose the Right Housing

    Most headlight upgrades start with the wrong question. Buyers ask which bulb is brightest, install it, and then wonder why the light looks scattered, why oncoming drivers flash them, or why the road ahead is a patchwork of bright and dark. The bulb matters, but the housing is what actually shapes the beam. It decides where the light lands, how clean the top edge of the beam is, and how much glare you throw at everyone else. Choosing between a projector and a reflector housing is the decision that determines whether an upgrade looks sharp and controlled or bright and sloppy.

    Two ways to aim the same light

    A reflector housing is a bowl lined with a mirror finish and divided into dozens of small angled facets. The bulb sits in the center, and each facet catches part of the light and bounces it forward in a slightly different direction. Because the light is spread across many surfaces, a reflector fills a wide area of road and is cheap to produce, which is why it has been the default on economy vehicles for decades. The trade-off is control: the top of the beam fades out rather than stopping cleanly, so some light always spills upward.

    A projector housing works more like a small film projector. The bulb sits behind an elliptical reflector that gathers the light, a metal cutoff shield trims the top of the beam, and a convex lens at the front focuses everything into a tight, aimed pattern. That extra hardware produces a bright, even hot spot and a sharp horizontal line where the light stops. The same design that makes a projector precise also makes it more expensive and slightly fussier to install, since there are more parts packed into the assembly.

    Beam pattern, cutoff, and glare

    The single biggest practical difference is the cutoff line. A projector’s shield creates a defined edge that keeps light below the eye level of oncoming drivers while still lighting the road out ahead. A reflector’s beam has a softer top edge, so more light scatters upward and sideways. On an empty rural road that scatter can feel like extra visibility, but in traffic it reads as glare, and it is the reason a poorly matched reflector setup gets flashed so often.

    High and low beam behavior differs too. A dual-beam projector uses a solenoid-operated shutter that drops the cutoff shield out of the way for high beam, so a single bulb covers both functions from one clean housing. A reflector typically needs either a dual-filament bulb or a second dedicated reflector to switch beams. Neither approach is wrong, but it changes which bulbs fit and how a replacement is wired.

    Bulb compatibility is where upgrades go wrong

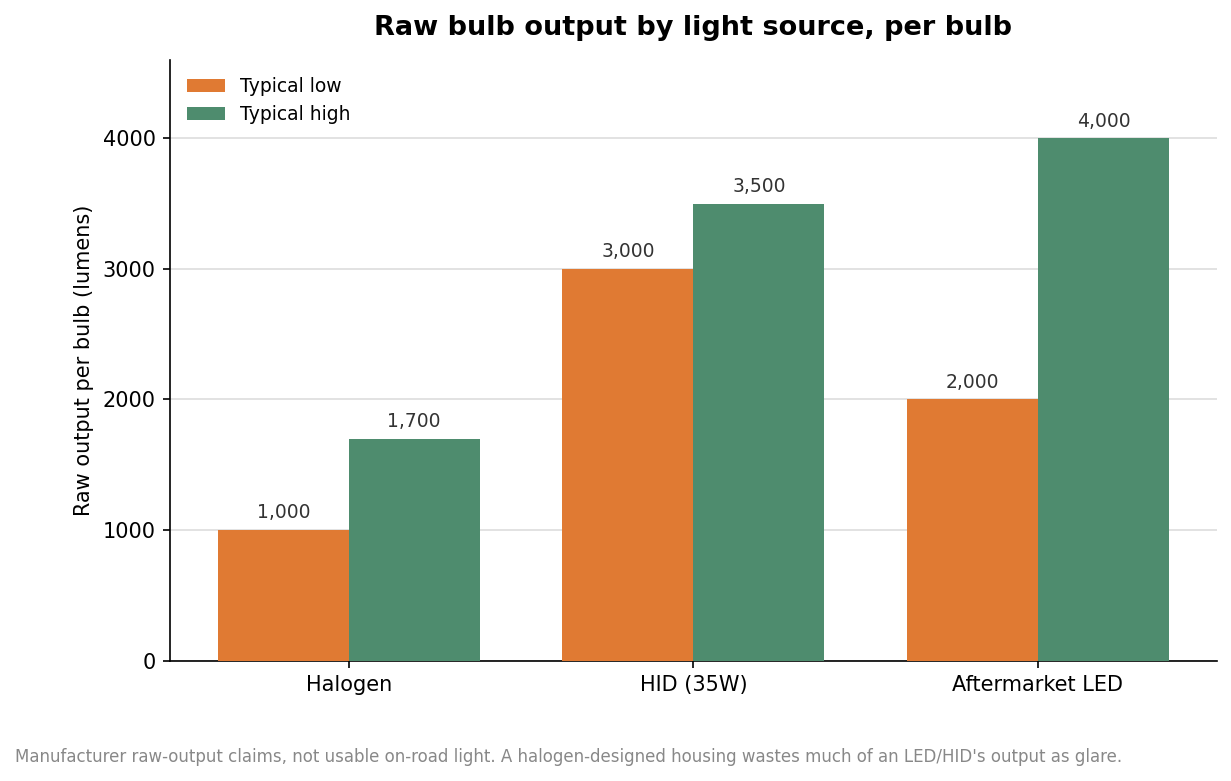
    Dropping an LED or HID bulb into a reflector housing that was engineered for halogen is the most common upgrade mistake, and the charts below show why the numbers are misleading. A halogen filament is a small glowing wire in a specific spot, and the reflector’s facets are cut to aim light coming from exactly that point. An LED bulb puts its light-emitting chips in a different geometry, and an HID arc is larger and positioned differently. The reflector aims that mismatched source in the wrong directions, so a bulb that claims far more raw output can actually deliver a worse, glarier beam than the halogen it replaced.

    Grouped bar chart of typical raw per-bulb lumen output for halogen, HID, and aftermarket LED bulbs
    Raw per-bulb output claims by light source; a halogen-designed housing cannot focus most of it.

    Projector housings tolerate a source swap somewhat better because the lens re-collects and re-focuses the light before it leaves the assembly, but only when the replacement bulb’s emitters sit close to where the original filament was. The reliable path is a housing built around its light source from the start: a factory or aftermarket bi-xenon or bi-LED projector is designed as one optical system, and it beats any mix-and-match bulb swap for beam quality. Treat raw lumen claims with suspicion and judge an upgrade by the shape of the beam on a wall, not the number on the box.

    What it costs and what is street legal

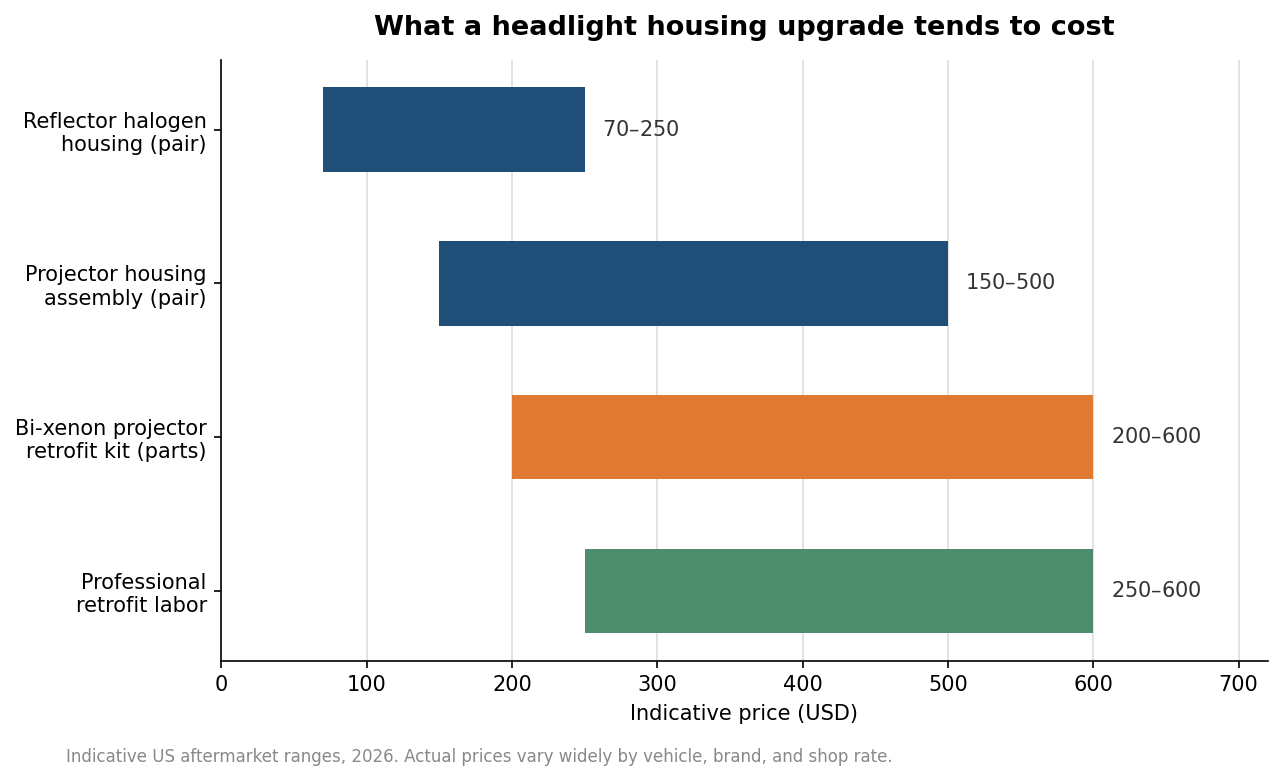
    Budget depends far more on which path you take than on brand. A set of replacement reflector housings for a common vehicle tends to run in the low hundreds, a projector assembly runs higher, and a full bi-xenon retrofit — installing projectors inside existing housings — adds both a parts kit and several hours of skilled labor because the housings usually have to be opened and resealed. The ranges below are indicative aftermarket figures for 2026 and vary widely by vehicle and shop.

    Bar chart of indicative 2026 US aftermarket price ranges for reflector housings, projector housings, bi-xenon retrofit kits, and retrofit labor
    Indicative aftermarket cost ranges for common headlight housing upgrade paths.

    Legality is the part buyers skip. In the United States, headlamps must comply with Federal Motor Vehicle Safety Standard No. 108, and a legitimate replacement housing carries a DOT stamp and an SAE marking for each function. Swapping the light source to something the housing was never certified with — the classic LED-or-HID-in-a-halogen-reflector move — is frequently not compliant even when it is brighter, because the certified beam pattern no longer holds. If street use and inspections matter to you, choose a housing and source that were tested together rather than assembling your own combination.

    Matching the housing to how you drive

    For mostly rural, unlit driving, a strong projector low beam paired with a capable high beam gives you reach and a clean cutoff that does not blind the occasional oncoming car. For city and suburban driving, where glare complaints and frequent traffic dominate, the projector’s beam control is even more valuable, and there is little benefit to the wide upward scatter a mismatched reflector produces. If budget is tight and the vehicle already has decent reflector housings, the best-value move is often a quality halogen bulb aimed correctly rather than an LED that the housing cannot focus. Spend on the housing and the aim first; the light source is the last decision, not the first.

  • Why Restored Headlights Go Cloudy Again

    Restoration has a reputation for not lasting, and the reason is a step that gets skipped because the result already looks finished without it.

    What the haze actually is

    Polycarbonate lenses ship with a thin factory hard coat that degrades under UV.

    Once it fails, the plastic underneath oxidises and the lens yellows and clouds.

    What sanding removes

    The damaged layer, and any remaining hard coat along with it.

    The lens is genuinely clear at that moment, and it is also completely unprotected.

    Why it hazes faster the second time

    Bare polycarbonate is more vulnerable to UV than the original coated surface was.

    So the same process runs again, quicker, and often within months.

    The step that changes the outcome

    A UV-stable clear coat applied over the freshly polished lens, quoted with a service life.

    Protection film over the top extends it further and takes the stone chips.

    When restoration is the wrong answer

    Hazing on the inside of the lens means water or a failing internal coating.

    Cracks and deep crazing cannot be sanded out. Both need replacement, not polishing.

  • The Complete Buyer’s Guide to Custom Headlights

    Front lighting is the one modification where the wrong choice is measurably less safe. These are the questions, in the order they should be asked.

    What is the optic, and what source was it designed for?

    Reflector, halogen projector and LED projector are three different optics.

    An optic only works with the emitter it was designed around. Sources are not swappable.

    Is this part road use or show use?

    A compliant lamp carries a DOT or SAE marking; state inspection rules vary on top.

    Heavy smoke, coloured halos and white front indicators are show and off-road choices.

    What does the finish cost in output?

    Every level of tint removes light, and the loss shows up on an unlit road in the rain.

    Ask for an estimate per tint level and get it on the quote before you approve it.

    Is a higher colour temperature better?

    No. 4300K to 5000K puts more usable light on the road and cuts through weather better.

    Above 6000K reads whiter and scatters more. Brighter-looking is not brighter.

    And check fitment against the trim, not the model

    One model year can ship halogen, LED and adaptive systems with different housings.

  • Why LED Bulbs in Halogen Headlights Do Not Work

    This is the single most common upgrade in the category and it is a downgrade almost every time. The reason is optical, not a matter of quality.

    A reflector is designed around a filament

    The bowl’s curvature is calculated for light leaving one exact point in space.

    That point is where the halogen filament sits, and nowhere else.

    An LED emitter is not in that place

    LED chips sit on flat planes on either side of the bulb body, not in a single point.

    So the reflector gathers light from the wrong origin and aims it in the wrong directions.

    What the driver sees versus what happens

    The scattered light makes the foreground and the surroundings look bright.

    Down the road, where you need distance, there is often less usable light than before.

    And the glare goes to everyone else

    The cut-off that kept light out of oncoming eyes is gone, which is why you get flashed.

    It is also what turns a modification into a genuine safety problem in traffic.

    The honest alternative

    A projector retrofit or an assembly designed as an LED unit from the start.

    It costs more than a bulb because it replaces the part that actually does the work.

  • How to Choose Headlight Tint Film: Shades, Materials, and Finishes

    How to Choose Headlight Tint Film: Shades, Materials, and Finishes

    Every way of darkening a headlight trades some of the light the lamp was engineered to throw for a look. That trade is the whole decision, and the smart version of it is choosing the method and shade that get the style you want while giving up the least night visibility. Custom headlight tinting comes down to three practical questions: which application method, how dark, and which material and finish. This guide walks through each so you can spec a clean, reversible result rather than a hazy one you regret at the first dark on-ramp. It sticks to the how; the separate question of what is street-legal where you drive is its own topic and is covered in our compliance guide.

    Three ways to tint, and why film usually wins

    There are really three methods. Spray tint is an aerosol tint sprayed onto the lens. It is cheap up front and can look even when done expertly, but it is hard to undo: reversing it usually means sanding or chemical stripping, which risks the clarity of the factory lens underneath. It is also prone to overspray, dust in the finish, and uneven curing, so consistency depends heavily on conditions and skill.

    Film, applied as a pre-cut or bulk sheet, is the route most shops steer toward, and it splits into vinyl and TPU. Film is manufactured under controlled conditions, so opacity is engineered and uniform rather than dependent on a spray pass. It peels away cleanly without residue and without harming the lens, which makes the whole modification reversible, and it doubles as a sacrificial layer that takes road rash and stone chips instead of the lens. The upfront price is a little higher than a can of spray, but because it protects the lens and can simply be replaced when it ages, it tends to be the more cost-efficient choice over the life of the car.

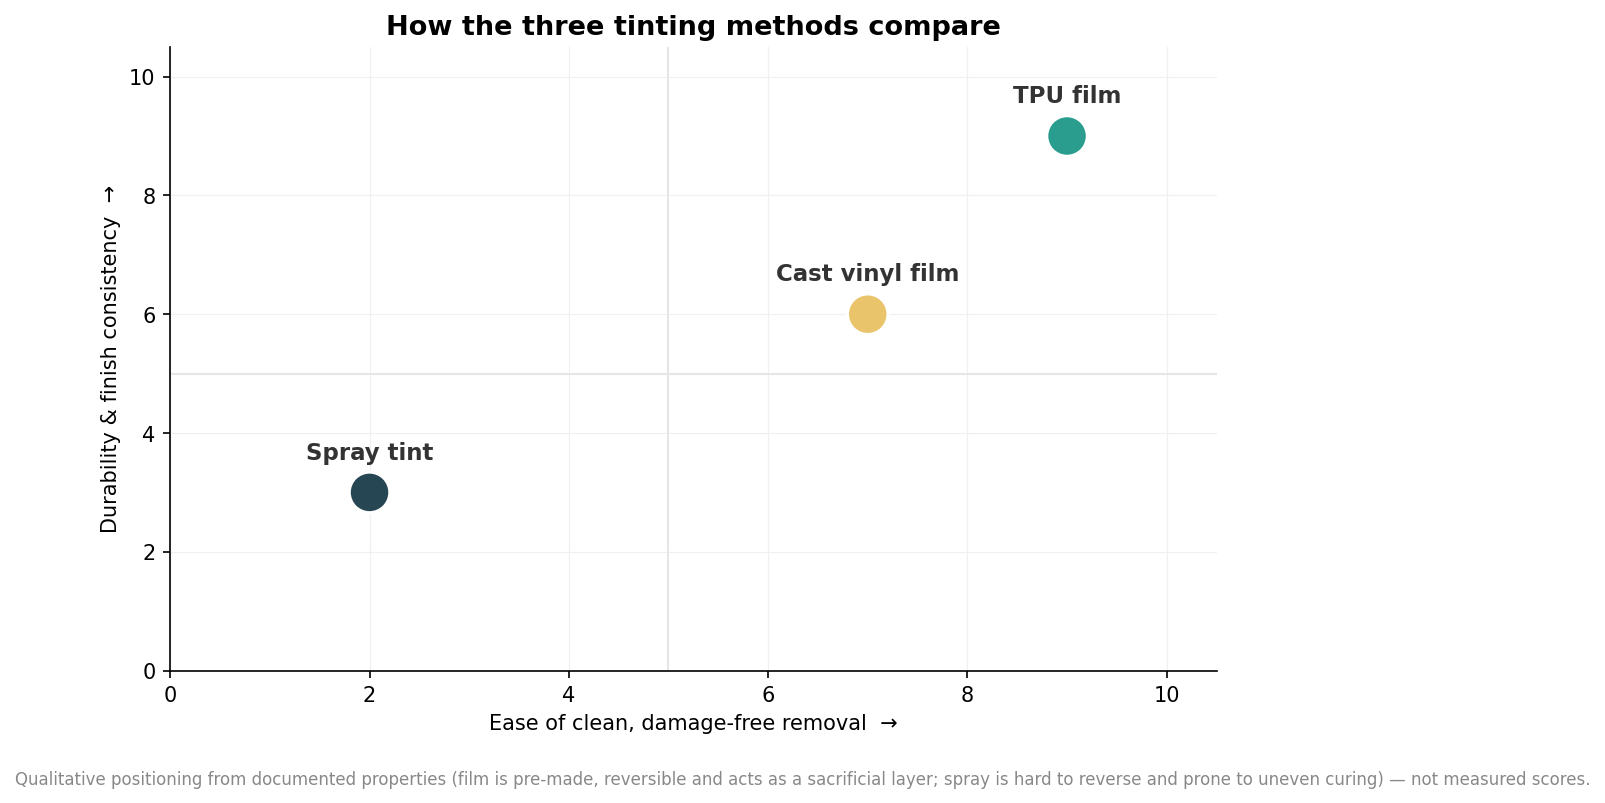
    Positioning chart comparing TPU film, cast vinyl film, and spray tint on reversibility and durability
    Film beats spray on clean removal and durability, with TPU strongest on curved lenses.

    The short version: spray is the cheapest to start and the most painful to reverse, vinyl film is a solid reversible middle, and TPU film sits at the top for durability and clean removal. Unless budget is the only constraint, film is the safer bet for a factory lens you may want clear again someday.

    Choosing a shade: darkness versus the light you need

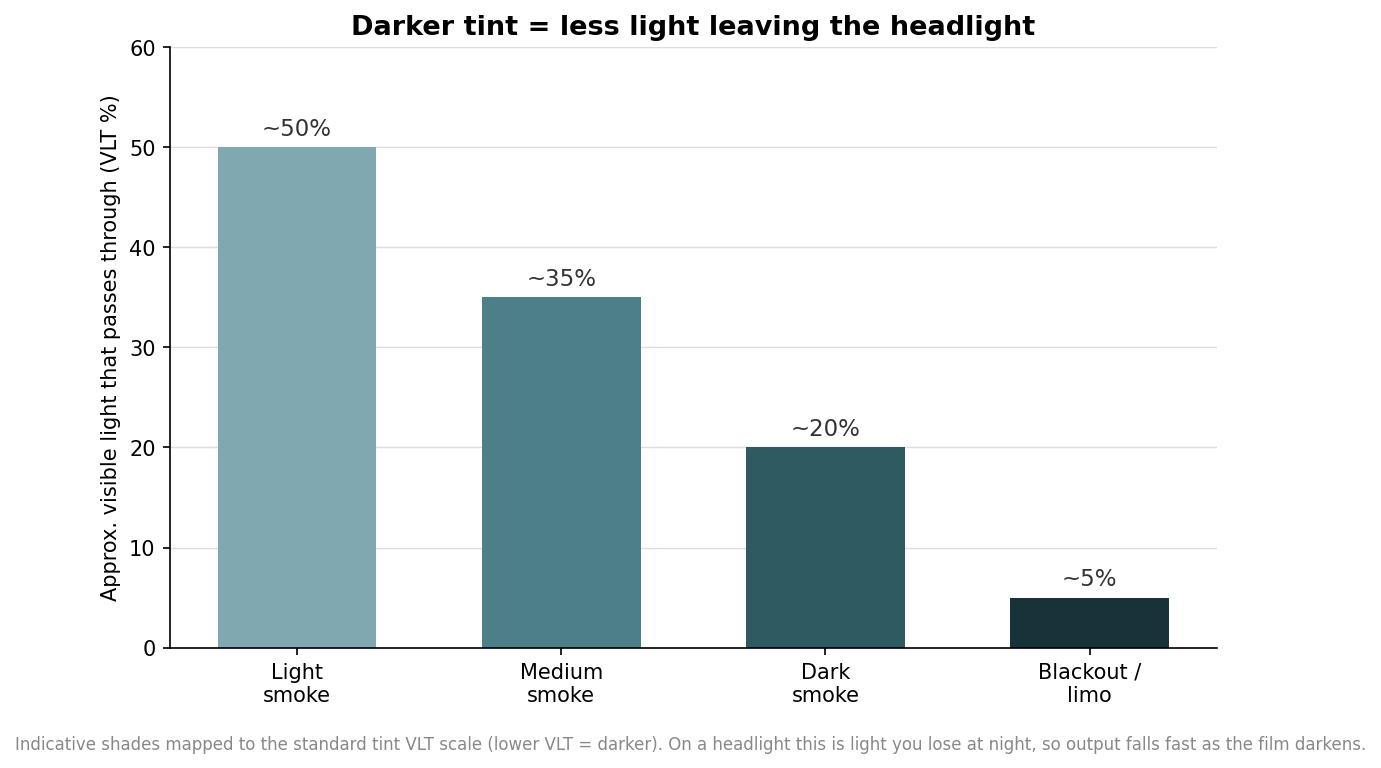
    Shade is where enthusiasm outruns physics. Tint is usually sold as light smoke, medium smoke, dark smoke, and a blackout or limo level, and it is easiest to reason about on the standard tint scale of visible light transmission, or VLT. A higher VLT number means more light passes through: a light smoke around 50% VLT lets roughly half the light through, a medium around 35% clearly darkens the lens, a dark smoke near 20% is heavily shaded, and a blackout near 5% is almost opaque.

    Bar chart showing visible light transmission percentage falling as headlight tint shade darkens from light smoke to blackout
    Darker shades pass far less light; on a headlight that is output you lose after dark.

    On a window, VLT is about privacy; on a headlight, it is the light you are throwing away. A headlight is a safety device with a designed output, and film sits directly in that beam, so a 20% dark smoke is not a modest styling tweak, it is cutting your usable light by roughly four fifths. The honest recommendation is to pick the lightest shade that delivers the look you are after. A light smoke gives most of the aggressive, blacked-out appearance in daylight and when the lamp is off, while surrendering far less output after dark, and it keeps you closer to whatever local rules require. Reserve the truly dark shades for show cars and off-road or trailer-queen builds that are not relying on those lamps to drive at night.

    Material: TPU versus vinyl, and why edges crack

    Among films, the material matters because headlight lenses are rarely flat. Many are compound-curved, bulging in two directions at once, and that is exactly where cheaper films fail. Cast vinyl conforms well to gentle curves and is the established, affordable option, but on a sharply curved lens it can lift and crack at the edges over time, especially if it was stretched hard or the corners were not sealed down properly.

    TPU, the same flexible material used in paint protection film, is built to stretch over rounded shapes and sit tight to the contour without wrinkling, so it handles aggressive lens curvature better and resists edge failure. It carries a higher material cost, which is the trade-off. If the lens is close to flat, vinyl is often all it needs; if it is a modern, heavily sculpted headlight, TPU earns its premium by staying put. Either way, the edges are the tell: a good install wraps or tucks them so nothing catches air, water, or a pressure washer.

    Finish, color, and specifying a clean result

    Beyond darkness, film comes in more than just black. Smoke is the standard gray-to-black tone, a yellow film mimics a classic fog-lamp or European look, and color-shift or chameleon films flip hue with the viewing angle for a show effect. Finish is usually glossy to match a headlight’s natural sheen, though matte is available for a stealthier appearance; a gloss finish generally reads as more factory-like on a lens. Whatever the color, remember the light passing through it takes on that cast, so a heavy yellow or dark smoke changes both the look and the character of the beam.

    To spec a clean job, start from how the car is used and let that cap the darkness: a daily driver wants a light shade that keeps the road lit, while a display build can go darker. Match the material to the lens shape, TPU for strongly curved lenses, vinyl for flatter ones, and choose a finish that suits the rest of the car. Insist on precut patterns or careful trimming and fully sealed edges, since sloppy edges are what turn a reversible upgrade into peeling, cracking, and trapped moisture. And confirm the local rules before committing to a shade. Get those choices right and headlight tint is a genuinely reversible piece of customization; get the shade or the edges wrong and it is a safety and clarity problem waiting to happen.

  • Are Tinted Headlights Legal? A Compliance and Safety Guide

    Are Tinted Headlights Legal? A Compliance and Safety Guide

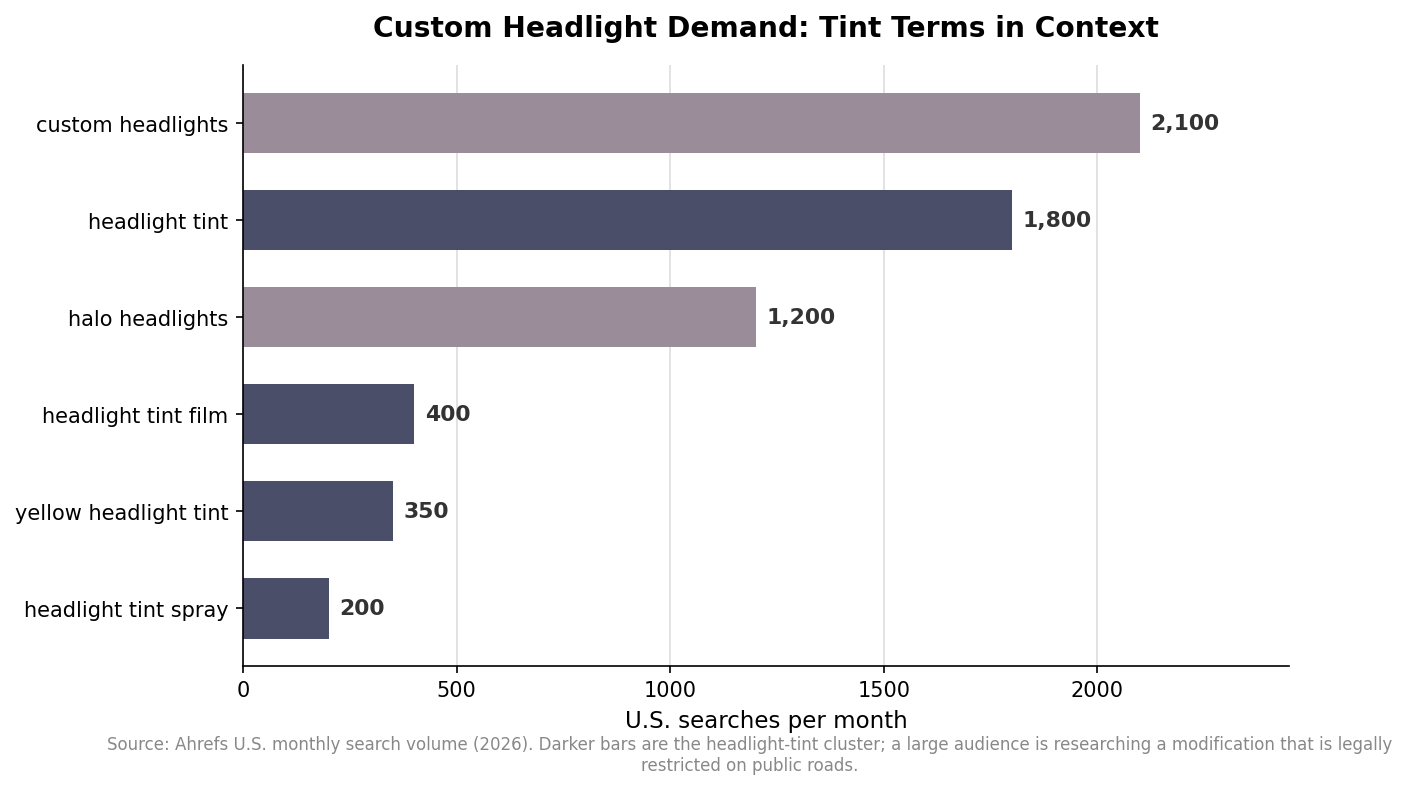
    Tinted headlights are one of the most searched car modifications there is, and also one of the most misunderstood. A smoked or yellow lens changes a car’s face instantly, which is why so many owners want it. What the styling photos rarely mention is that headlight tint sits in a very different legal category from window tint, and getting it wrong can mean a failed inspection, a fix-it ticket, or a genuinely dangerous car at night. Before you order film or reach for a spray can, it is worth understanding the rule that governs all of this and where the real line sits.

    Horizontal bar chart of U.S. monthly search volume for custom headlight and headlight tint terms
    Headlight tint terms draw large monthly search demand, yet the modification is legally restricted on public roads.

    The federal rule: headlights must be white

    All vehicle lighting in the United States traces back to a single federal standard, FMVSS 108 (codified at 49 CFR 571.108). Among many other requirements, it establishes that a vehicle’s headlamps must emit white light. That standard is the foundation states build their own enforcement on, and it is why the color of your headlight output is not really a style choice in the eyes of the law. Anything applied over the lens that shifts the beam toward a color, or that cuts the amount of light coming through, runs against the intent of that rule for a headlamp used on public roads.

    Fog lamps are treated a little differently. Many states permit fog lights in the white-to-yellow range, which is why amber fog lenses and bulbs are more widely accepted than an amber headlight. That distinction matters: the leniency people have heard about for yellow lighting generally applies to fog lamps, not to the main headlamps.

    What that means state by state

    Here is the part that surprises people. When you line up all fifty states, darkened or color-altering headlight tint is effectively prohibited for on-road headlamps everywhere. State references that catalog the laws list headlamp tint as not permitted across the board, because any material that reduces output or changes the color falls outside what a compliant headlight is allowed to do. There is no equivalent of the “you can go down to 35 percent” window-tint allowance for your headlights.

    The meaningful exception is clarity. A clear protective film, the paint-protection-style layer that guards the lens against rock chips and hazing without darkening the beam, is typically acceptable because it does not alter output. In other words, the legal question is not really about film versus spray or one brand versus another; it is about whether the covering changes what leaves the headlight. Clear and unchanged tends to be fine. Smoked, amber, or noticeably dimmed tends not to be, regardless of how it was applied. Because enforcement and inspection practice vary, the only reliable move is to check your own state’s current vehicle code and inspection standard before committing.

    The safety math you can’t tint away

    Legality aside, there is a physics problem that no product can market its way around. A tint film or spray works by absorbing part of the light passing through the lens, so a darker headlight is, by definition, a dimmer headlight. In daylight that is invisible. At night, on an unlit road, it directly shortens how far ahead you can see and how much time you have to react. The darker the finish, the larger that penalty. This is the core reason the standards exist, and it is why tinting the lights you actually drive on at night is a poor trade even in places where enforcement is light. If you are set on a smoked look, confining it to a show car, an off-road build, or lighting that is not your primary night-driving beam keeps the safety cost where it belongs.

    Film versus spray, if you tint anyway

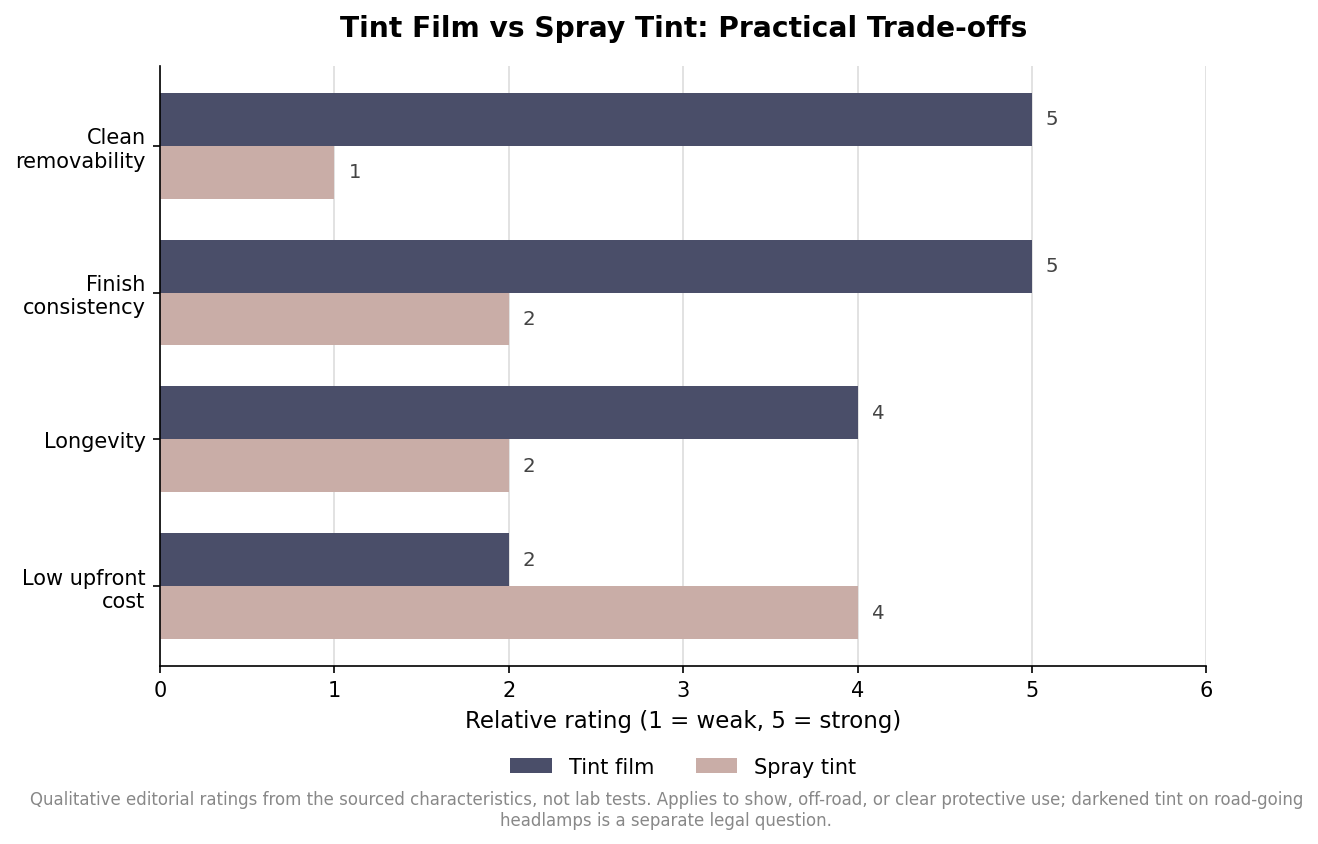
    For owners tinting a show or off-road vehicle, or applying a clear protective layer, the choice between film and spray is a real one and the two are not close on the things that matter long term. Tint film behaves like a sacrificial layer: it is manufactured to a consistent thickness, goes on with cleaner edges under controlled conditions, and can be peeled off later without residue or damage to the lens. That reversibility is its biggest advantage, because it lets you undo the modification for an inspection, a sale, or a change of heart.

    Grouped bar chart comparing tint film and spray tint on removability, finish, longevity and cost
    For show or protective use, film beats spray on removability, finish, and longevity; spray only wins on upfront cost.

    Spray tint is cheaper to start and can look good when done skillfully, but it is difficult to reverse cleanly. Removing it often means sanding or chemical stripping, which risks permanently hazing the lens, and applied outside a clean booth it is vulnerable to overspray, dust, and uneven curing that shows as blotchiness over time. Sprayed finishes are also more prone to fading and cracking with sun and heat exposure. The upfront savings can evaporate the first time you need the lights clear again. For most people the removability and repeatability of film outweigh the lower initial cost of spray.

    How to customize headlights the smart way

    You can change how your headlights look without fighting the light-output rule. A clear paint-protection film keeps the lenses looking new and adds a subtle gloss while staying compliant. Housing-level styling, such as swapping to a projector or halo design that still throws proper white light, changes the character of the front end without dimming the beam. And restoring yellowed, oxidized lenses often does more for a car’s face than any tint, while improving output rather than reducing it. If you still want a smoked aesthetic, keep it to vehicles that do not run at night on public roads, and treat any legal or percentage figure you read as a starting point to verify against your local code rather than a guarantee. The look is tempting, but headlights are safety equipment first and styling second, and the rules reflect exactly that.

  • Hello world!

    Welcome to WordPress. This is your first post. Edit or delete it, then start writing!